Performing Blood Glucose Test
How to Perform a Blood Glucose Test
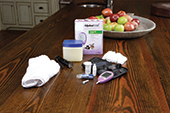
The AlphaTRAK Starter Kit has everything you need to make blood glucose testing at home successful. With AlphaTRAK and a little diligence, you can manage your pet’s diabetes.
Select a testing site
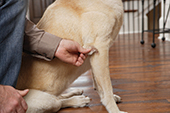
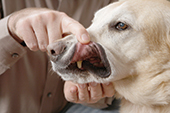
On dogs: marginal ear vein, side of the paw pad, elbow callus, or the inside of the upper lip
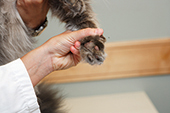
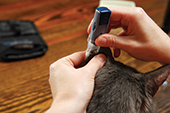
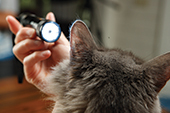
On cats: Marginal ear vein, or side of the paw pad

Step 1:
Gather all supplies needed to perform a test.
- AlphaTRAK meter
- Lancet
- Testing strips
- Petroleum jelly (to help blood form droplets)
- Gauze or cotton wool

Step 2:
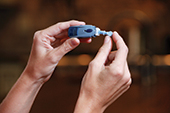
Insert a new lancet into a lancing device, push until it comes to a complete stop and replace the clear cover.
- Adjust the lancing device depth by rotating the wheel: 1 is the shallowest, 4 is the deepest.
Step 3:
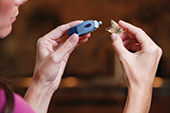
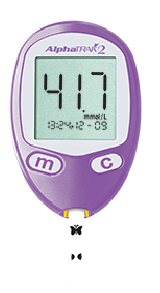
Turn the meter on by inserting a test strip with the butterfly on the test strip facing up and flying into the meter. Confirm that the code on the meter matches the species code on the test strip vial.
Step 4:
Using the lancing device, draw a small amount of blood from the selected testing site. Don’t worry, this is relatively painless to pets and causes very little discomfort. See TIPS AND TRICKS below.
Step 5:
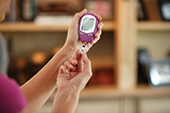
With the meter, touch only one side of the test strip to the blood drop. You will hear a beep and see the lines moving on the meter display to indicate it is working.

Step 6:
Results appear in seconds. Record the glucose reading and discard the used test strip and lancet.
TIPS AND TRICKS
Use the Same Site Each Time You Test
This helps to ensure consistent results. If the testing site gets irritated or if you are having a hard time collecting a sample, use an alternate site. It is good to find at least two sample sites that work well on the pet.
Prepare the Location
Before starting a test, pick a well-lit place where both you and the pet are comfortable. You may wish to gather petroleum jelly, to help the blood drop form, and some tissue or gauze for lancing and clean-up.
Familiarise the Pet with the Sound of the Lancing Device
To help avoid startling the pet, it may help to hold the device close to its ear and press the button a few times before performing the test for the first time.
Prepare the Testing Site:
- If you choose the marginal ear vein as the testing site, it may help to use a flashlight to see the vein better and to place gauze or a cotton wool behind the ear to make a firmer testing surface.
- If you choose the paw pad, select an area on the side of the paw that your pet does not step on.
- To increase blood flow, prior to lancing, warm the sample site by gently rubbing, applying a warm cloth or a bag or sock filled with rice and warmed in the microwave for 20 seconds.
- To help the blood form into a droplet, apply a very thin layer of petroleum jelly to the sample site before lancing.
If Needed, You May Add More Blood
Only touch one side of the test strip to the blood drop for each test. If the blood drop was too small, you may add more blood to the same test strip for up to 60 seconds. Make sure you add blood to the same side of the test strip.
- If you are having trouble getting a blood sample, try applying gentle pressure to the test site with the lancing device or changing the lancing device penetration.
- Once the test is complete, apply gentle pressure to the test site with gauze or a cotton wool to stop the bleeding, if needed.
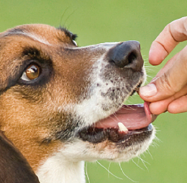
Reward
You may want to give your pet a diabetes-friendly reward after you are done with the test.